Jan 25, 2024 | Makeblock
Arduino boards make learning electronics fun and accessible for all ages. It’s always easier to learn through hands-on activities. The Arduino project provides an engaging way to get kids interested in building and operating electronics.
Arduino is open-source and easily accessible. Instead of feeling limited, kids are free to get as creative as they want, which is ideal for STEM activities.

Arduino coding projects for kids need to be both interesting and easy for beginners. Otherwise, kids might give up before they get started. These eight projects are ideal for any kids new to Arduino and will inspire them to try even more projects later.
You’ll need an Arduino kit and a battery to get started with any of these projects. Here are 8 easy Arduino projects for kids to get them fixed in this quick-changing world:
1. Electronic Dice
If you’re interested in Arduino UNO projects with code, the Electronic Dice project is a great place to start. This project teaches kids how to build their own electronic die.
When kids press the button, the LEDs randomly light up until they stop on a random number. While simple, it’s a great introduction and makes kids feel proud.
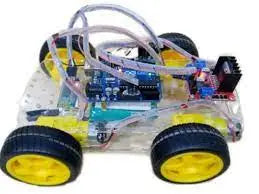
2. Makeblock mBot Mega
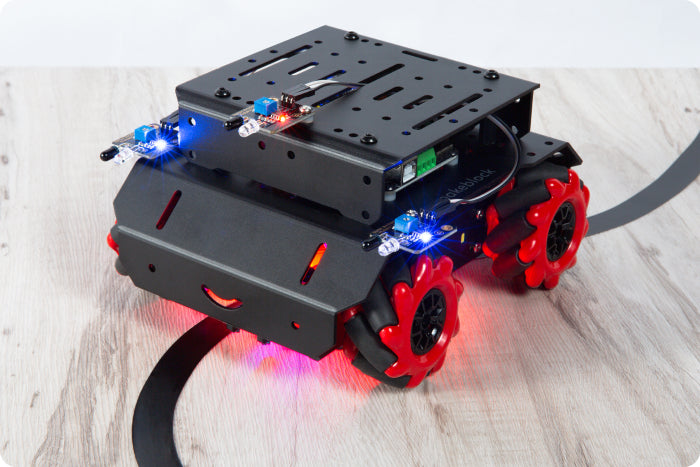
If you are an arduino fan and looking for an entry-level robot kit, then you cannot miss this advanced robot kit – mBot Mega. There are even more fun playing with 4WD mecanum wheels moving in any direction.
Based on Mega AT2560, it has a strong motor-driving ability that can connect to up to 10 servos, 8 DC motors, or 4 stepper motors at the same time. It also supports Arduino IDE and Scratch with a detailed construction guide. With 3 preset modes for an easy start and easy assembly, this is a great learning & educational toy gift for kids and adults as well.
3. Simple Interactive Robot
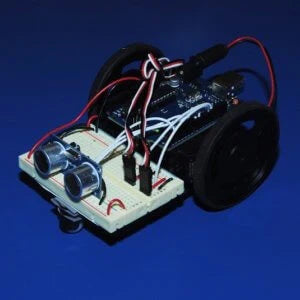
Who doesn’t love to play with robots? The Simple Interactive Robot is one of the best Arduino programming projects. It’s extremely simple to do and makes a great introduction to both electronics and programming.
You’ll need some 3D printed parts, which you can do with some easy-to-use 3D printers for kids. When kids finish, their robot can walk, avoid anything in its path and even make sounds.
4. Portable SMS Device

While kids may have their own smartphone, do they really know how it works? You’ll need a SIM card in addition to the standard supplies, but you can create your very own Portable SMS Device.
Much like a phone, the device can both send and receive texts. This is one of the more popular Arduino UNO projects with code. It doesn’t take long to put together and kids might just feel like the next Steve Jobs by the time they’re finished.
5. Remote Controlled Robot

The Remote Controlled Robot is a great option for kids who also love Legos. Of course, you can also custom print pieces with a 3D printer, such as Makeblock’s mCreate. The small robot works much like an RC car. It works over WiFi and can be put together in minutes. You’ll want an Arduino Nano board to better fit the size of a small RC car.The best part is kids can program it to go as fast or slow as they want. You may even want to build your own roads to play on.
6. Breath Controlled Windmill
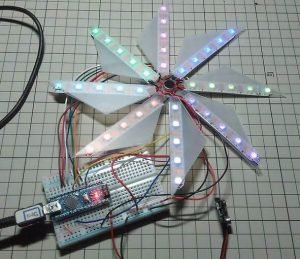
Imagine if you could blow into a microphone and cause a windmill to spin. You can with the Breath Controlled Windmill. While one of the simpler Arduino projects for kids, it’s great for beginners and teaches how sounds can be used with electronics.
LED lights make the windmill look great and make it stand out even more when it’s spinning. When you finish, turn off all the lights, blow into the mic and enjoy the show. While it doesn’t technically spin, the lights make it seem as if it is.
7. Digital Pet

If you ever got in on the Tamagotchi trend, either the original or the more recent revival, the idea of building your own version is probably exciting. With the Digital Pet project, you can. While adults will likely love this one too, it’s one of the most engaging Arduino coding projects for kids too. Since parts need to be soldered together, make sure kids have adult supervision.
This project looks like an old intercom speaker, but features a screen to display the pet. You can interact with it through feeding, monitoring it health and more.
8. Bluetooth Controlled Toy Car
If the Remote Controlled Robot wasn’t quite enough of a car for you, try the Bluetooth Controlled Toy Car. Instead of WiFi, this car is controlled via Bluetooth. Not only does the car move around using two motors, it also features LED lights for some fun in the dark. All you need is an Android device to start driving the car.
Once again, create some roads to help kids learn to navigate their new car. Circuit Digest details exactly how to make this fun project.
If you’re eager to get started with your very first Arduino project, look no further. We will show you a simple Arduino project with mBlock to meet the fantasy of this project.
The Arduino, Meet LED project is ideal for parents and kids to learn together. It’s one of the simplest Arduino projects for kids. As the name implies, the project teaches kids how to use an Arduino board to turn an LED light on and off.
You’ll need a computer (Mac or Windows), an Arduino UNO, an LED light (any color will work), a USB connector (comes with an Arduino kit) and Makeblock’s mBlock software. The software helps kids learn to code through a drag-and-drop method. You can use manual coding too. However, you’ll need software in order for any code to communicate with your Arduino board.
Once the mBlock software is installed, connect your Arduino board to your computer to program it.
Step 1: LED Light Setup
Since you’ll be turning an LED light on, you’ll need to connect the LED light to the board. The longer leg connects to PIN 13 and the shorter leg to GND. Parents should help younger kids with this one.
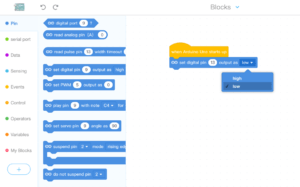
Step 2: Connect Arduino with mBlock
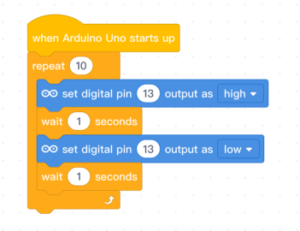
Now, select Arduino in mBlock. Next, choose Events and drag the “When Arduino starts up” to the Blocks section. Now, it’s time to program the light itself. Open the Pins group. Drag “set digital pin 9 output as high” under your first block. Change “9” to “13.” Choose Upload and be amazed!
Step 3: Turn on and off this LED Light
Now that your LED light is on, it’s time to turn it off. Go back to mBlock and look at your second block of code. Notice that it says “high”? In this case, high means on. So, if you want to turn off your light, choose “high” and change it to “low.” Now, your light is off.
Arduino projects are made to be built upon. Let’s go another step. Add another block of code below the second one that says “set digital pin 13 output as low.” Choose Upload. While you won’t technically see anything happen, the Arduino actually turned the light on and off so fast, you didn’t see it.
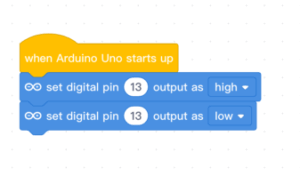
Step 4: Slow Down the Process
You’ll need to slow the process down to see your LED light dance. In the Controls section, drag the “wait 1 seconds” in between your two digital pin code blocks. This tells the light to turn on, wait one second and then turn off.

Step 5: How to Make the LED Light Repeating This
You’ve finally gotten to see your LED light turn on and off, but you probably want a little more. All you have to do is create a loop. Drag the “repeat 10” block directly underneath your “when Arduino starts up” block. When you look at the code, you’ll see that it now repeats your on and off instructions 10 times. However, there’s still one piece missing.
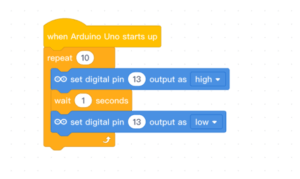
Right now, your code doesn’t tell your Arduino to wait between each repetition. Simply add one more “wait 1 seconds” block under the “set digital pin 13 output as low” block. Now, choose Upload and watch your light dance.
Makeblock wants to make it easy for kids to learn more about how electronics and programming work. Arduino projects for kids are the perfect way to get started. Check out Makeblock Official US Store for more STEM products and projects.